Earth science has a way of making the invisible suddenly visible. The layers of rock beneath our feet, the slow creep of tectonic plates, the forces building silently under the ground for years before the earth finally moves — none of it is something we can see with the naked eye. And yet it’s all happening, constantly, right beneath us.
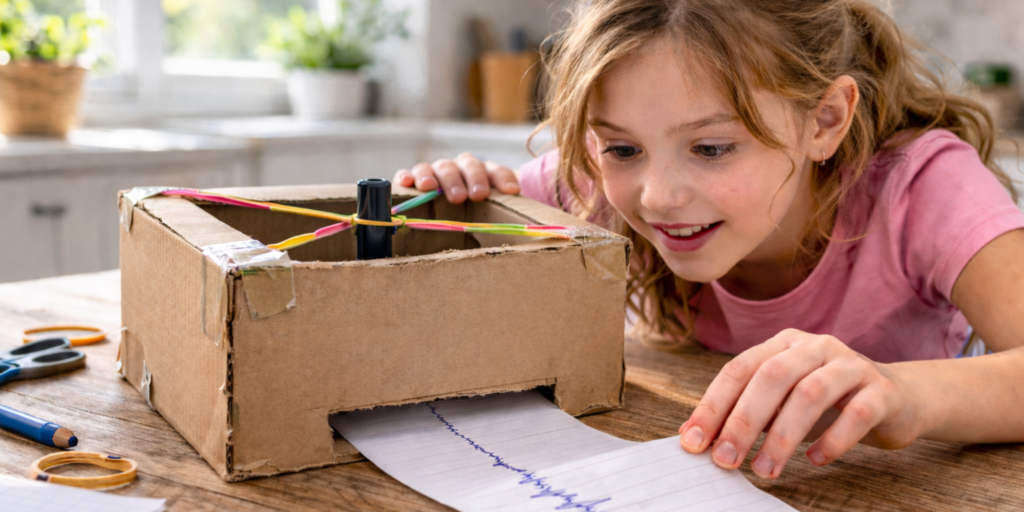
This experiment makes some of that visible. With a cardboard box, a marker, and a few elastic bands, she’s going to build a seismograph — the kind of instrument scientists use to detect and record ground movement. And here’s the thing: it actually works. The line it draws will change when the table shakes. She’ll see the energy of a movement recorded in real time, on paper, by a machine she built herself.
That’s a hard thing not to be impressed by.
This seismograph experiment for kids is a simple way to explore how earthquakes and vibrations can be recorded using a model built at home.
Quick experiment guide:
- Age: 8–12
- Time: 20–30 minutes
- Mess level: Low
- Science topic: Earthquakes and seismic waves
What she’s going to learn
A seismograph is an instrument that records vibrations in the ground. When the Earth moves — whether that’s a major earthquake somewhere in the world or just a lorry rumbling past the end of the street — a seismograph picks it up and draws it as a line. The bigger the movement, the bigger the line.
What she’ll understand by the end of this experiment is that earthquakes travel as seismic waves — pulses of energy moving through the Earth. When those waves reach the surface, the ground moves. The seismograph records that movement as a line on paper. A small shake makes a small wave. A big shake makes a big one. The line is evidence — a readable record of energy moving through the Earth.
Real seismographs do exactly this, just with far greater precision. Scientists use them to detect earthquakes, measure their strength, pinpoint where they started, and study how seismic energy travels through the Earth’s layers. Some earthquakes are so small they’re completely unfelt by humans — but a seismograph catches them anyway. This is how scientists detect earthquakes you can’t even feel.
Worth pointing that out when she makes her first line on paper.
Seismograph Experiment for Kids: Build Your Own Earthquake Detector
This build takes about 20 minutes and uses things you almost certainly have at home. The satisfaction-to-effort ratio is very high.
What you’ll need
- A sturdy cardboard box — shoebox size works well
- A marker with a clip-on lid, or a pen you can attach securely
- 4–6 elastic bands
- Tape
- Scissors (adult supervision for younger ones)
- 2–3 sheets of A4 paper
- A ruler
- A notebook to record observations and predictions
Before you build — ask for a prediction: Before a single piece of card is cut, ask her: how do you think it’s going to work? How does a machine record shaking? What do you think the line will look like when the table moves? Get her to write it down. It doesn’t matter if she’s right or wrong — the prediction is the start of the scientific process, and checking it at the end is half the fun.
How to build it
- Prepare the box: Cut a large rectangular hole in the top of the box, leaving about a 3 cm border around the edges. This gives you a sturdy frame and an open window to see what’s happening inside.
- Add paper slots: Cut a narrow slit on each short side of the box, near the bottom — just wide enough for the paper to slide through smoothly. This is how your recording strip feeds through the machine.
- Make the recording strip: Cut the A4 sheets lengthways into long strips and tape them together end to end to make one continuous strip. Feed it in through one side and out through the other.
- Build the suspension system: Link the elastic bands together into a chain. Stretch them diagonally across the top of the open box from corner to corner, so they cross in the middle. Tape the ends down firmly. These are your suspension springs — they’re what allows the marker to hang freely.
- Attach the marker: Clip the marker by its lid into the centre of the elastic band cross, so the tip points downward and just barely touches the paper below. This is the most important adjustment — the tip should graze the paper, not press into it. If it presses too hard, it drags. If it doesn’t touch, it won’t record anything. Take a minute to get this right.
Now test it
Start with the baseline. Slowly pull the paper strip through the box while the table is still and nothing is moving. She should see a mostly straight line. This is what calm looks like — what scientists call a baseline reading.
Now create an earthquake. Gently tap the table, then try a bigger shake, then a fast vibration. Pull the paper through as you go and watch the line change — from straight, to wavy, to spiky, to chaotic depending on the force.
Ask her to label each section of the strip as she goes — small tap, big shake, fast vibration. She now has a record. A piece of data. Something she produced herself that tells a story about energy and movement.
Keep the questions coming
While you’re testing, resist the urge to explain everything. Ask instead.
- What do you notice about the line when you shake harder?
- Can you make the smallest earthquake possible — what does that look like on paper?
- If you shake quickly versus slowly, does the line look different?
- If someone else looked at your strip without seeing what you did, could they tell which shake was the strongest?
That last question is actually what seismologists do every day — they read lines on paper and reconstruct what happened underground. If she can look at her own strip and interpret it, she’s doing the same thing.
If she wants to push further, try this:
- Can she create three clearly different “earthquakes” and label them by strength?
- Can someone else look at the strip and correctly identify which was strongest — without being told?
- What happens if she changes the tension in the elastic bands? Does that affect the sensitivity of the machine?
Each new question is a new experiment. That’s not just a nice thing to say — it’s the actual structure of scientific research.
Why it matters — beyond the kitchen table
The bigger picture is worth pausing on here — because when she understands why something matters, that’s when it really sticks.
Earthquakes feel like something that happens elsewhere — dramatic news footage, distant cities, other people’s lives. But the Earth’s tectonic plates are moving right now, under all of us, all the time. Most of the movement is too small for us to feel. Seismographs pick up what our bodies can’t.
The work seismologists do isn’t just about understanding earthquakes after they happen — it’s about using that data to build better early warning systems, design safer buildings, and understand the structure of a planet that we live on top of but know surprisingly little about. They’ve mapped the Earth’s inner core using seismic waves alone. No one has ever been there. No probe has ever reached it. The knowledge came from lines on paper — exactly like the ones she just made.
That’s what science does. It takes the invisible and makes it legible. And that skill — looking at data and asking what story it’s telling — is one of the most valuable things she can learn.
After the experiment
When the experiment is done, go back to her prediction. Was she right about how it would work? Was she surprised by anything? Ask her what she’d change if she built it again — better materials, a different design, a more sensitive suspension.
That conversation — what worked, what didn’t, what next — is the one scientists have after every experiment. She’s just had it too.
More hands-on science for curious girls
Pick one and do it this week — your future scientist will thank you.


Loved this topic?
The Hey Smart Girl Book of Earth Science explores fossils, oceans, weather, earthquakes, climate, and the brilliant scientists who changed how we understand our planet.
Explore the Earth Science Book